Skip to content →

Tag: apple

SSL on Mac OSX

A
longer term project is to get the web-server www.matrix.ua.ac.be integrated in our home-network
as an external WebDAV-server (similar to the .Mac-service
offered by Apple). But as this server runs all information about the
master-class on non-comutative geometry connecting to it via HTTP to use
WebDAV is too great of a security risk as all username/password
combinations will be send without encryption. Hence the natural question
whether this server can be set up to run SSL (Secure Sockets
Layer) such that one can connect via HTTPS and all exchanged information
will be encrypted. As the server is an Apache it comes down to get
mod-ssl running. A Google on mod_ssl OS X gives the
ADC-document Using mod-ssl on Mac OS X which seems to be just
what I want. This page is very well documented giving detailed
instructions of using the openssl command. However, the
end-result is rather weak : it only makes the localhost running
HTTPS, that is, one can connect to your own computer safely… which is
pretty ridiculous (other computers in the same network cannot even
connect safely).

So, back to the Google-list on which
one link raises my interest Configuring mod-ssl on Mac OS X which looks like
the previous link but has one essential difference : the page is written
by Marc Liyanage. If you ever tried to get PHP and/or MySQL
running under OS X you will have noticed that his pages are by far the
most reliable on the subject, hence maybe he has also something
interesting to say on mod-ssl. However, the bottom line of the
document is not very promising :

You
should now be able to access the content with https://127.0.0.1 from
the same machine.

which is again the
localhost. So perhaps it is just impossible to run mod-ssl
without having an X-server. Anyway, let us try out his procedure.
Begin by issuing the following commands in the Terminal

sudo -s cd /etc/httpd mkdir ssl chmod 700 ssl cd
ssl gzip -c --best /var/log/system.log > random.dat openssl rand
-rand file:random.dat 0

Next, we need a server certificate. If you
want to do it properly you need a certificate from a certification
authority
such as Thawte but this costs at least $200 a year which I
am not willing to pay. The alternative is to use a self-signed
certificate
which will force the browser to display an error-message
but if the user dismisses it all traffic exchanged with the server will
still be encrypted which is just what I want. So, type the command

openssl req -keyout privkey-2001.pem -newkey rsa:1024
 -nodes -x509 -days 365 -out cert-2001.pem

(all on one line).
You will be asked a couple of questions (the only important one is the
Common Name (eg, YOUR name). Here you should take care to enter
the host name of your web server exactly as it will be used later in the
common name field. In my test-case, if I want to get my server
used by other computers in the network this name will be
imaclieven.local. (note the trailing .). Now issue the following
commands

chmod 600 privkey-2001.pem chown root
privkey-2001.pem apxs -e -a -n ssl /usr/libexec/httpd/libssl.so

which will activate the SSL-module (if at a later state you want
to de-activate it you have to change -a by -A in the last command).
Finally, we have to change the /etc/httpd/httpd.conf file so
first save a backup-version and then add the following lines at the end
of the file :

(IfModule mod-ssl.c)     Listen 80    
Listen 443     SSLCertificateFile /etc/httpd/ssl/cert-2001.pem    
SSLCertificateKeyFile /etc/httpd/ssl/privkey-2001.pem    
SSLRandomSeed startup builtin     SSLRandomSeed connect builtin   
 (VirtualHost -default- :443)         SSLEngine on    
(/VirtualHost) (/IfModule)

Observe that round brackets ()
should be replaced by <>. Finally, we do

apachectl
stop apachectl start

and we are done! Going to another computer
in the network and typing in Safari https://imaclieven.local./
will result in an error message


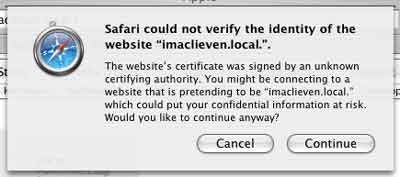
Just click Continue and you will have a secure connection
to the server. Thanks Marc Liyanage!

(Added january
11th) Whereas the above allows one to make a HTTPS connection it is not
enough for my intended purposes. In order to get a secure connection to
a WebDAV server, this server must have the mod-auth-digest module
running which seems to be impossible for the standard Apache server of
10.3. You need an X-server to have this facility. So I think I have to
scale down my ambitions a bit.

Leave a Comment

iMacBondiBlue

We
still have an original iMac (Bondi Blue). It runs at 233 MHz,
has 192Mb RAM and a hard-disk of 4Gb, so is pretty outdated. Still, when
Mac OSX was introduced I had a hard time installing extra RAM in it (for
this model you have to take it apart disconnecting all sorts of cables)
so it would be a shame if this oldest member of the family is left out
of the network. The problem is that it has an Ethernet card but no
possibility to include an Airport-Card… So I bought a D-Link Wireless USB adapter and was told that installation would be
plug-and-play : just connect it to the USB-port, open up the
Applications/Utilities/Airport Setup Assistant and everything
would rum smoothly. Hahah! When I started the Assistant it was clever
enough to detect that no Airport-Card was installed and refused further
action. But, there is a CD in the package so I did install the driver
which really adds a new icon Wireless Adaptor to the System
Preferences
. Clicking it gave the sobering message No Wireless
Device Attached
and I couldnt press the Scan button for detection of
possible networks. But disconnecting the D-Link a number of times and
pressing it very hard eventually I got a wireless icon in the toolbar
but still it couldnt give me a signal strength of available networks.
But that might be right as the ABS is protected both by WEP and by
MAC-access. So, I added the MAC-address of the D-Link to the list in the
Access Control pane of the Airport Admin Utility which
also gives a way to get at the Hex-equivalent of the WEP-key : click on
the Password icon. So, i manually created in the Wireless
Adaptor-preferences a network with the correct name, WEP-key equivalent
and so on and thought that would do it. But no, now I did get a signal
strength but it showed that I was not connected and that the WEP-key was
incorrect. On the other hand, no complaints were listed when i tried to
access the ABS as Peer-to-peer but this created all other sorts
of problems as I could detect with iStumbler so I quickly removed
this option and got to bed.

This morning I realized
that I still have the old Graphite Airport Base Station lying
idle so I connected it with a patch cable to the Router, reconfigured it
without WEP-protection and without Access Control and instructed
BondiBlue to connect to this new network, which it immediately managed
to do but it took a few restarts and time to get it onto Internet and
connected to other computers on this second network. So, now I will
increase security on this new network and see where it fails. First, add
Access Control by including the MAC Address of the D-Link and other
computers, reconfigure the ABS and the BondiBlue is still on the
network! Next, WEP : in the Apple documentation it is mentioned to take
a passphrase of exactly 5 symbols to ‘increase compatibility with
third-party products’. Let’s try ab;12, change in the
Wireless Adaptor-Prefrences the properties of the network by
choosing Enable WEP 40 Bits ASCII (5 characters) and give the key
ab;12 and sure enough : everything works! So the problem was that
our regular network is WEP-protected by a longer passphrase and D-Link
could not handle the HEX-equivalent 10 digit number. A final attempt :
in the D-Link documentation a solution is offered by giving the ABS a
10-digit Hex together with a starting $-sign so let’s try
$4bb2603b52 on the ABS and 4bb2603b52 in the properties of
the D-Link preferences : success!

However, if I try
any of these two methods on the Airport Extreme base-station,
none of this works! If it were not for the USB-network printer on the
extreme ABS I would just replace it again with the Graphite. Still, I’m
fed up with it for today, BondiBlue is online but via Graphite and all
other computers can communicate with it when they change stations.

Leave a Comment

WarWalking (3)


This time we turn to Ethereal, ‘sniffing the glue that holds the
Internet together’. Here is the description they give : “Ethereal is a
free network protocol analyzer for Unix and Windows. It allows you to
examine data from a live network or from a capture file on disk. You can
interactively browse the capture data, viewing summary and detail
information for each packet. Ethereal has several powerful features,
including a rich display filter language and the ability to view the
reconstructed stream of a TCP session”. Whereas OSX is not included it
is possible to get Ethereal running under OSX but it
requires some work. To begin you need to have the XTools
installed (the extra CD shipped with 10.3) (btw. you probably needed
already the XTools to get Kismet up and running). Secondly, you
need to have X11 in Applications/Utilities. This is not a
standard option if you install 10.3 but with a custom install you can
install X11. If you haven’t done this, no problem, you can download X11
from the apple-site (43Mb! download). And finally you need
to have Fink installed (see a previous
post
). If you are set, open the Terminal and type

sudo fink install ethereal-ssl

Fink will tell you that it needs some additional packages to
install (12 in my case) and you agree to this with typing Y. Get
yourself a coffee and a book or newspaper because the compilation
process takes quite a while (in my case it took over one hour!). When it
finally stops you hope to be done, so start up X11 and type

sudo /sw/bin/ethereal

and it
works! If you want to begin sniffing you have to click on
Capture/Start and a pop-up window appears. Specify en1 as
Interface and click on Ok. If after some time you press
Stop all the captured packages appear in the main window and you
can start playing. We will see another time what exactly you can do with
all this information…

The previous time that I
tried to install Ethereal (on an iBook) I got an error message :
dyld: /sw/bin/ethereal can’t open library: /sw/lib/libdl.0.dylib (No
such file or directory, errno = 2)
. Fortunately a simple Google gave
me the following work-around. So if you get into problems that will
probably solve them. I also needed to type xhost in X11 to
allow su to use my window. But, none of these problems appeared right
now so maybe they updated the package.

Moreover,
Ethereal is very well documented both with an online manual-page and a User’s guide (which you can also download as
PDF-file : 454 pages! but only the first 100 or so are worth
printing).

Leave a Comment