Skip to content →

Category: web

iMacBondiBlue

We
still have an original iMac (Bondi Blue). It runs at 233 MHz,
has 192Mb RAM and a hard-disk of 4Gb, so is pretty outdated. Still, when
Mac OSX was introduced I had a hard time installing extra RAM in it (for
this model you have to take it apart disconnecting all sorts of cables)
so it would be a shame if this oldest member of the family is left out
of the network. The problem is that it has an Ethernet card but no
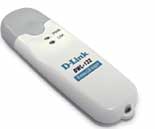
possibility to include an Airport-Card… So I bought a D-Link Wireless USB adapter and was told that installation would be
plug-and-play : just connect it to the USB-port, open up the
Applications/Utilities/Airport Setup Assistant and everything
would rum smoothly. Hahah! When I started the Assistant it was clever
enough to detect that no Airport-Card was installed and refused further
action. But, there is a CD in the package so I did install the driver
which really adds a new icon Wireless Adaptor to the System
Preferences
. Clicking it gave the sobering message No Wireless
Device Attached
and I couldnt press the Scan button for detection of
possible networks. But disconnecting the D-Link a number of times and
pressing it very hard eventually I got a wireless icon in the toolbar
but still it couldnt give me a signal strength of available networks.
But that might be right as the ABS is protected both by WEP and by
MAC-access. So, I added the MAC-address of the D-Link to the list in the
Access Control pane of the Airport Admin Utility which
also gives a way to get at the Hex-equivalent of the WEP-key : click on
the Password icon. So, i manually created in the Wireless
Adaptor-preferences a network with the correct name, WEP-key equivalent
and so on and thought that would do it. But no, now I did get a signal
strength but it showed that I was not connected and that the WEP-key was
incorrect. On the other hand, no complaints were listed when i tried to
access the ABS as Peer-to-peer but this created all other sorts
of problems as I could detect with iStumbler so I quickly removed
this option and got to bed.

This morning I realized
that I still have the old Graphite Airport Base Station lying
idle so I connected it with a patch cable to the Router, reconfigured it
without WEP-protection and without Access Control and instructed
BondiBlue to connect to this new network, which it immediately managed
to do but it took a few restarts and time to get it onto Internet and
connected to other computers on this second network. So, now I will
increase security on this new network and see where it fails. First, add
Access Control by including the MAC Address of the D-Link and other
computers, reconfigure the ABS and the BondiBlue is still on the
network! Next, WEP : in the Apple documentation it is mentioned to take
a passphrase of exactly 5 symbols to ‘increase compatibility with
third-party products’. Let’s try ab;12, change in the
Wireless Adaptor-Prefrences the properties of the network by
choosing Enable WEP 40 Bits ASCII (5 characters) and give the key
ab;12 and sure enough : everything works! So the problem was that
our regular network is WEP-protected by a longer passphrase and D-Link
could not handle the HEX-equivalent 10 digit number. A final attempt :
in the D-Link documentation a solution is offered by giving the ABS a
10-digit Hex together with a starting $-sign so let’s try
$4bb2603b52 on the ABS and 4bb2603b52 in the properties of
the D-Link preferences : success!

However, if I try
any of these two methods on the Airport Extreme base-station,
none of this works! If it were not for the USB-network printer on the
extreme ABS I would just replace it again with the Graphite. Still, I’m
fed up with it for today, BondiBlue is online but via Graphite and all
other computers can communicate with it when they change stations.

Leave a Comment

WarWalking (3)


This time we turn to Ethereal, ‘sniffing the glue that holds the
Internet together’. Here is the description they give : “Ethereal is a
free network protocol analyzer for Unix and Windows. It allows you to
examine data from a live network or from a capture file on disk. You can
interactively browse the capture data, viewing summary and detail
information for each packet. Ethereal has several powerful features,
including a rich display filter language and the ability to view the
reconstructed stream of a TCP session”. Whereas OSX is not included it
is possible to get Ethereal running under OSX but it
requires some work. To begin you need to have the XTools
installed (the extra CD shipped with 10.3) (btw. you probably needed
already the XTools to get Kismet up and running). Secondly, you
need to have X11 in Applications/Utilities. This is not a
standard option if you install 10.3 but with a custom install you can
install X11. If you haven’t done this, no problem, you can download X11
from the apple-site (43Mb! download). And finally you need
to have Fink installed (see a previous
post
). If you are set, open the Terminal and type

sudo fink install ethereal-ssl

Fink will tell you that it needs some additional packages to
install (12 in my case) and you agree to this with typing Y. Get
yourself a coffee and a book or newspaper because the compilation
process takes quite a while (in my case it took over one hour!). When it
finally stops you hope to be done, so start up X11 and type

sudo /sw/bin/ethereal

and it
works! If you want to begin sniffing you have to click on
Capture/Start and a pop-up window appears. Specify en1 as
Interface and click on Ok. If after some time you press
Stop all the captured packages appear in the main window and you
can start playing. We will see another time what exactly you can do with
all this information…

The previous time that I
tried to install Ethereal (on an iBook) I got an error message :
dyld: /sw/bin/ethereal can’t open library: /sw/lib/libdl.0.dylib (No
such file or directory, errno = 2)
. Fortunately a simple Google gave
me the following work-around. So if you get into problems that will
probably solve them. I also needed to type xhost in X11 to
allow su to use my window. But, none of these problems appeared right
now so maybe they updated the package.

Moreover,
Ethereal is very well documented both with an online manual-page and a User’s guide (which you can also download as
PDF-file : 454 pages! but only the first 100 or so are worth
printing).

Leave a Comment

WarWalking (2)


MacStumbler and iStumbler are active scanners sending out
probe messages to the basestations and can therefore be detected easily.
Moreover, they are not able to detect closed networks. So let us
move up one step in the secrecy scale and get some passive network
scanners
running. The first one is KisMAC which instructs the Airport card to tune to
a channel, listen a while, then tune to the next channel and so on. In
this way KisMAC can detects networks without announcing its
presence and can also find closed networks. More information can
be found at the KisMAC documentation page.
Installation is pretty straightforward : click on the KisMAC
installer
icon and after answering a few obvious questions you need
to provide your Administer-login and password after which KisMAC
is installed in your Applications-folder so also copy it to your
dock. The reason why it needs admin privileges to run is that the
Airport card cannot perform passive monitoring. So it swaps to open
source Viha driver for your Airport-driver on startup and
reinstalls the Airport driver on exit (that is, is everything goes well,
sometimes you seem to have lost your Airport connection afterwards but
no harm is done which cannot be solved by either checking in your
SystemPreferences:Network or by a restart. So do not worry if you
see that your Airport icon (as well as all your usual wireless access
such as Internet and Mail) vanishes. Before you can perform a scan, you
have to go to the KisMAC-Preferences and choose under Driver a
capturing device (in some versions of KisMAC you have to specify Viha
driver
if you are running an Airport card, in others you have to go
for the option Apple Airport Card,Passive mode. If you press the
Scan button you are again asked for admin-password to perform the
driver-switch (the same happens if you Quit KisMAC). The program gives a
wealth of information which can be quite useful if you want to find out
about possible interference of your ABS with other wireless sources. We
will come back to some of these features later, a rather scary one is
the ability to log raw 802.11 frames to a dump which can then be fed to
Ethereal.

Okay,
let us go one step further and try to get Kismet
running. It seems to be an unwritten law in open source-software that
the more potential harmful a program is, the more difficult it is to
install, so installing Kismet is by no means trivial.
Fortunately, Kismet is very well documented with a manual and a forum. First, we need the Viha Airport
driver
, that is we need Viha Wireless Tools 0.0.1a Binary Release. Go in Terminal to the
Desktop-folder where you will find the Folder Viha-0.0.1a.
Then type

mv Viha-0.0.1a/WiFi.framework/
/Library/Frameworks/

Next, we get the latest
version of Kismet, that is kismet-3.0.1.tar.gz and get a kismet-3.0.1
folder on our Desktop. Use Terminal to go into this folder and
type

./configure –disable-pcap –enable-viha;
make

and the following process may last for a
while. If you finally get a prompt, type

sudo make
install

and the process will end with some
warning messages :

If you have not done so
already, read the README file and the FAQ file. Additional
documentation is in the docs/ directory. You MUST edit
/usr/local/etc/kismet.conf
and configure Kismet for your
system, or it will NOT run properly!
Kismet has NOT been
installed suid-root. This means you will need to start
it as
root. If you have no untrusted users on your system, it can be
installed
as suid-root via ‘make suidinstall’. READ THE
DOCUMENTATION BEFORE INSTALLING KISMET AS SUID-ROOT!”

Fine, so let us go to /usr/local/etc and change the
following lines in kismet.conf

suiduser=lieven
source=viha,en1,Airport

(of course you have to replace lieven by your
normal OSX login name). Further, in the file kismet_ui.conf
replace the last line by

apm=false

Finally, you have to type in the Terminal

export TERM=xterm-color

and you should
be done. To launch Kismet, type as your usual user (the one you
specified in the kismet.conf file) in the Terminal

Kismet

and all will work. Again there is
a switch of Airport to Viha driver (and if all works well also at the
end). Often, the Airport card does not come up at the end in which case
it is best to restart Kismet and Quit again (btw. you quit Kismet with
capital Q). Then the Airport icon appears but it may be that you have to
logon to your network again.

We wouldnt have done so
much trouble if it were not that Kismet is a VERY powerfull
application which can be used to Hack wireless networks. But if you
think that KisMAC and Kismet are already scary, wait until
next time when we deal with Ethereal

Leave a Comment